• Superfood Salad and Skin Treatment

  • Hollylujah! Onion Rings

  • Healthy Pad Thai

  • Zucchini Pasta with Walnut Pesto

Showing posts with label recipes. Show all posts

Superfood Salad (and bonus skin treatment!)

Hi there folks! Long time no see. I've been busy with the holidays and FINISHING COLLEGE (yay!) and am now applying for jobs, so forgive my lack of posts lately. But now that I'm back, I'm excited to bring some new changes to the blog and start writing about more than just food!

I've actually been on a new, pretty strict eating plan as of late, so that's another reason there haven't been any new recipes lately.

But here's one I haven't shared yet, and it's one of my absolute favorites. This salad is a great meal to make on the weekend and eat for lunch all week. As a bonus, you can actually give yourself a little natural skin treatment after you make it! Cooking and a relaxing spa treatment, sounds like a perfect weekend, no?


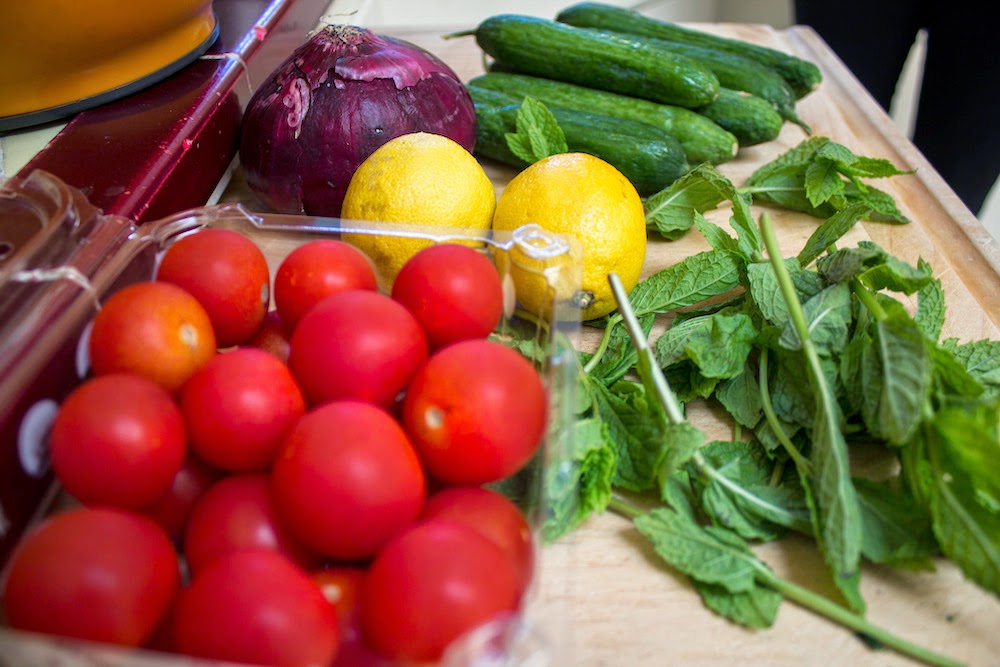
Superfood salad with quinoa, kale, avocado, and more goodness

Serves 4-ish

Ingredients

For the salad:
  • 1 cup dry quinoa (rinsed and drained)
  • 1⁄2 pint cherry tomatoes, halved
  • 1 can black beans, rinsed and drained
  • 1 avocado, pitted and diced
  • 1 bunch kale, de-stemmed and chopped
  • 1⁄2 cucumber, sliced
  • 1⁄4 red onion, sliced
For the dressing:
  • 1⁄4 cup lemon juice
  • 1⁄4 cup olive oil
  • 1 garlic clove, minced
  • Salt and pepper to taste
Note: The diet I'm on is very restrictive on oil and salt. Today I would blend the avocado right into the dressing instead of the olive oil, and use a salt-free lemon pepper seasoning instead of the salt and pepper. In case you want to up the health quotient on this even more!


Method

  1. Cook the rinsed quinoa in 1.5 cups water, over low heat in a pot or rice cooker for about 15 minutes, or until most of the liquid is absorbed. Set aside to cool, chill in fridge. (Quinoa can be prepared up to a day in advance)
  2. Chop tomatoes, avocado, onions, cucumbers, and rinse black beans and combine in a medium bowl. De-stem and chop kale and place in a large bowl.
  3. Mix lemon juice, oil, garlic, salt and pepper. Pour dressing over the kale and “massage” for a few minutes. This helps improve the texture and flavor of kale.
  4. Mix all ingredients into the dressing and kale mixture.

Makes about 4 servings as a main dish, 6 as a side. Will last 5-7 days in the refrigerator.

Optional: Skin Treatment

Some of the ingredients used in this salad can be used as skin treatments after you finish making the salad! 
  • Scrape the skin of the avocado and rub the extra into any dry skin as an intense moisturizer. 
  • Leave on for a few minutes and set some cucumber slices on your eyes.
  • After a few minutes, wash off the avocado with a warm wash cloth.
  • You can use any leftover lemons/lemon juice as a toner.

Throwback Thursday: Last Thanksgiving


Thanksgiving is only a week away, and I'm getting so excited! I'm in the final planning and prepping stages for this year, and reflecting a bit on how things went the first time around.

Hollylujah's original incarnation is still out there, and its only two posts were about last year's Thanksgiving. This post explained my crafty pumpkin place cards, and this post was a roundup of how each recipe turned out.

Here are some photos from the day:


Homemade pumpkin spice lattes (vegan, natch)

Craftiness

The setup

Pumpkin candle holders = <3

Kale salad with delicata squash and all kinds of other goodness

Roasted green beans with cranberries and walnuts

It was pretty delicious if I recall.
Chocolate brownie pumpkin pie with crunchy pecan topping and maple coconut whipped cream. Say that 3 times fast.

My parents, ladies and gentlemen.
Good times :)

If you're interested in trying any of those recipes, they were all linked on the old blog. Last year was so wonderful, and one of my favorite memories ever. I can't wait to do it again!


My Thanksgiving Menu (first draft, anyway!)

Hello! It's been a while. I've missed blogging, but some other things have been taking up my time.

For example, we rescued a bunny in August and she's been the center of my world ever since. She's a sweet, silly, and shy little lop with helicopter ears (one up and one down - the cutest thing ever). We named her Penny Lane, and spoil her rotten. There will probably be some posts about her in the near future, actually. But for now, just look at that cute face!

I've also been really busy chipping away at my last semester of college EVER. Only another 5 weeks or so until I'm a college grad! It's an exciting, slightly terrifying, and definitely busy time.

In between all that and more, I've still been cooking up a storm, and I'll have quite a few new recipes to share soon.

This month, however, my focus is delightfully directed toward Thanksgiving, as once again I am hosting this year! (There will probably be some flashback posts soon about the menu and decor from last year - they were on a different blog.)

I have been pinning and organizing the potential recipes for weeks, and today I may just have finalized the menu. I recently eliminated wheat and refined sugars from my diet, so had to factor that into the planning process, and I managed to create a menu that works! So without further adieu, here is a 100% vegan, gluten-free, refined sugar-free Thanksgiving menu that I can't wait to bring to life:

Main Course: Thanksgiving Meatless Loaf from FatFree Vegan Kitchen. After 3 blissful years of ordering the Native Foods Wellington (a puff pastry filled with meaty seitan, yams, kale, and stuffing and topped with what is arguably the best mushroom gravy in existence), we decided to go our own way this year (plus, the wellington has tons of wheat). We chose a meatless loaf that doesn't pretend to be meat. It's full of vegan staples - beans, tofu, veggies - delicious thanksgiving herbs and spices, and looks like it will be completely perfect when slathered in mushroom gravy. Speaking of which...

Gravy: Happy Herbivore's Everyday Mushroom Gravy - Quick fangirl moment - Lindsay Shay Nixon is by far my favorite plant-based cookbook author (and idol). She's a pro at creating recipes that are as simple as they are delicious, and her compassionate "progress not perfection" approach to the vegan lifestyle is a refreshing change of pace. Anyway! I'm not sure if this simple gravy recipe is anywhere online, but it can be found in two of Lindsay's books, Everyday Happy Herbivore and Happy Herbivore: Holidays and Gatherings (which is new this year and also the source of another recipe I plan to try - fangirling over!)

Stuffing: Southern Cornbread Stuffing from Food to Glow - When I asked my boyfriend if he had any special requests for Thanksgiving (which also falls on his birthday this year), he suggested cornbread. So when I realized I also had to start looking for a wheat-free stuffing recipe, this was a no-brainer. This recipe was the first to pop up in my search, and it had me at hello - I think it's going to be the home run recipe of the year.

Salad: This is going to be my original recipe, so look for that post in the next few weeks once I get it right. But it will be a kale salad with plenty of autumn accents.

Other side dishes: Garlic/rosemary mashed potatoes, simple roasted green beans, and Happy Herbivore's sweet potato casserole from her new holiday book.

Dessert: GF Maple-Nut Pumpkin Pie. I'm trying a hybrid of this simple pie filling made with cashews and this gluten-free crust made with pecans, and topping it all off with the maple coconut whipped cream that we loved last year. Making some small changes to make the recipes work together, and to work with my current diet, but I'm excited to see how this turns out.

And there you have it! I couldn't be more thrilled to make and eat all of this in a few weeks. What new recipes are you trying this year?

Cheesy Vegetable Kale Chips

Those delicious cheesy kale chips you can buy at the store are delicious and oh-so-healthy, but at about $5 a bag they are quite an investment. This is a pretty easy batch you can whip up for about half the price, yielding about 3-5 times as many chips. SCORE!

(If you want a simpler, faster roasted kale recipe without all of the cheesiness, I gotcha covered too)

This recipe is super fleixble. You can make them in the oven or dehydrator, using a blender or food processor, and you can even mix up the ingredients if you want. Swap lime juice for the lemon and squirt in some sriracha sauce. Use sun dried tomatoes instead of a carrot. Go nuts and be creative and enjoy the magical disappearing act that follows (read: these taste great and you will eat them quickly).


Onward to the recipe!

Hollylujah! Onion Rings

There's a burger spot in our neighborhood with vegan options, and my boyfriend and I like to go there after an active day, or when we're simply feeling indulgent. I love their vegan and portobello burgers, but their onion rings are the BEST, and probably the reason we go about once a month. They're beer-battered and deep fried and probably not even vegan though, so I've been jonesing to come up with a healthier alternative to make at home.

The idea to make them with almonds was always there, in order to lower the carbs and make the fats healthier. But I started off a bit over-zealous, planning to make the almond milk at home and dehydrate the leftover almond crumbles to turn into almond flour and a crunchy coating. This is exactly what I did, but it took forever, so next time I will probably simplify a bit. :) In fact, I have come up with a simple method, so I will share all of your options in this post, depending on where you fall on the zealous-ometer.

Note: I will continue to tweak this recipe and add more photos and an instructional video. But if you can't wait, give it a go!


On to the recipe...

Recipes of the moment: Jul 24

While I do have some exciting new recipes in the works this week, in between I've been trying some recipes from other bloggers in between. Here are two of recipes I'm trying at the moment:

  1. Yesterday I made my first batch of homemade coconut bacon, using this recipe from The Simple Veganista. It tastes eerily like bacon (granted, I haven't had the real thing in at least 5 years, but STILL). It's delicious, and dangerously addictive.
    Coconut Bacon

    It also made a great BLTA with hummus and red onions, which made quite a splash on instagram yesterday for some reason. I guess people can't resist a pretty sandwich!
  2. Yesterday's lunch: the BoLThA?
  3. Today I'm making a batch of raw portobello jerky, courtesy of Choosing Raw. The idea for this struck me when I was enjoying the meaty texture of my recent marinated portobello burgers. When I started my research, this recipe looked so much like what I wanted to create that I decided to just go with it. I marinated the sliced caps last night and they are currently in the dehydrator. The house is smelling SO smoky and jerkylicious as I type :)
    Raw portobello mushroom jerky
Today I'll be refining my healthy onion ring recipe, and assuming nothing goes horribly wrong, that recipe should be here tomorrow! Stay tuned!

To be continued...


Healthy Pad Thai? YES.

Hello hello! I am back from a wonderful visit in Los Angeles with friends and family. I was anxious to get back to cooking, so I stopped at the store on my way back into town and stocked up on a bunch of fresh ingredients to fill my week with new recipes. Among them was a spaghetti squash and some powdered low-fat peanut butter, both of which were calling me the next day when I was craving pad thai.

Pad thai is delicious, but never really considered healthy, so I was on a mission to reduce the guilt of this incredible dish as much as possible. Using baked spaghetti squash instead of rice noodles cuts the carbs down by about 30g per serving, and by using powdered peanut butter, the fat is reduced by 85%.

Here's a nutritional comparison for this recipe vs the same exact one prepared with regular peanut butter and rice noodles:

This recipe: 135 calories, 3g fat, 21.1g carbs (full nutrition facts at the end of this post)
Traditional: 430 calories, 16.7g fat, 55.9 carbs

The numbers don't lie. Onward to the recipe!


Marinated Portobello Burgers Recipe

My adventures in creating recipes from farmer's market finds continue...

There was a mushroom stand on Sunday with baskets of various mushroom varieties, all marked at $5 a basket. There was only one portobello basket left, and it was mine. I knew right away that they would become burgers, so all that was left was to decide on a marinade. Here's what I came up with...

Why I put the lettuce on the bottom, I'll never know.
Onward to the recipe!

Mediterranean Grilled Veggie Bowl with Tahini Sauce

I was a bit tired last night and trying to come up with a last-minute dinner that could use the leftover zucchini from this pasta, as well as the red pepper and eggplant I got at the farmers market on Sunday. I found this recipe, which I could make with a few substitutions, so I went for it. It is absolutely delicious and I suggest you try it if you enjoy mediterranean flavors. Rather than retype the recipe (maybe I'll update it later, but I don't have time today), here are the substitutions I made:


Mediterranean Grilled Veggie Bowl with Tahini Sauce (Adapted from Chow)

(Click the link if you want the original recipe, these are only the changes I made)
  • I didn't have roasted tahini, so I ground up some roasted sesame seeds. It was about 2 2/3 tablespoons to make 2 tablespoons of packed sesame seeds, and I just blended that right into the lemon juice and olive oil for the dressing. I also forgot the garlic, but didn't notice, and it was still fantastic.
  • I didn't have a shallot, so I used up 1/3 of a red onion I had leftover from a different recipe.
  • I used Trader Joe's Harvest Grains Blend instead of just couscous, because it's what was in my pantry. It's mostly couscous, but with a orzo, garbanzo beans, and red quinoa mixed in. Upgrade!
  • I also grilled up the leftover inside chunks of zucchini from yesterday's pasta adventure.
  • I sprayed the vegetables with my misto instead of brushing them, but who knows if this used less oil in the end. I sprinkled them with lemon pepper instead of just salt and pepper. It tasted very lemony (but not overly so) in the end, which I love.
  • Grilling took forever because I have a george foreman grill, but hopefully that helped with the oil problem.
  • I also didn't have fresh parsley, so I threw in a tablespoon and a half of dried.
The result was so delicious, it was addictive, and I had to fight the urge to eat the rest right out of the pan. It was the perfect end to an exhausting day.


Not a very exciting post for today, but I promise I'll make it up to you tomorrow with marinated portobello mushroom burgers! :)

Zucchini Pasta with Walnut Pesto (low-carb and low-calorie)

I had a pretty great Sunday. It started with my first-ever Zumba class and swimming with my good friend Nena (whose awesome Tech blog you can find here, btw). Afterward, there happened to be a farmer's market in the parking lot, so we got some cash and went produce hunting. I scored on a lot of goodies that will be sure to inspire many new recipes this week. Here's my loot:

GET IN MAH BELLY
Inspired by the unhealthy hummus we found there, we went back to my house and made the hummus that I posted yesterday, and then I started to think about what else I could make this week. I got some extra long zucchini that would make great noodles, and so much basil would have to become pesto. So yesterday afternoon I got to work, determined to make a delicious new pasta dish that would be as healthy as possible.

If you've never made zucchini noodles, you're missing out. Cooked just a little, zucchini closely resembles the texture of pasta, and when you add some sauce you can hardly tell the difference. It makes a great lasagna noodle as well. 

To cut the noodles, a special slicer is ideal. I have a mandoline slicer (this one) that can make julienned strips, but this spiral slicer is officially on my wish list. If you don't have the appropriate slicer or the cash to splurge on one right now, you can use a vegetable peeler to create long, flat, linguine-like shreds. I don't recommend just using a knife for this, though. I tried it once, and the results were not worth the time and effort required.

Whether you peel the zucchini first is up to you - it's really just a question of aesthetics and nutrition. The skin adds a bit more color and fiber, but I'd recommend peeling your zucchini if it isn't organic, to reduce your chemical intake. However you choose to slice your noodles, stop when you get to the seeds. I like to save the insides for other recipes - they're good grilled! :)

If you want more info on the various ways to prepare zucchini noodles, check out this thorough Wikihow article

Ummm, hi.

Onward to the recipe!

Hollylujah Hummus

Hummus, you know I love you. You're the perfect dip and sandwich spread, you are a delicious and easy source of protein, but we've got to talk. You're packed with oil, and everyone knows it. You're not fooling anyone. What we have is beautiful and I don't want it to end, but just hope I can change you, so that I can enjoy you without all of the guilt.

Turns out hummus is pretty flexible. Check out this new and improved version of my love, with a quarter of the oil, half the salt, and all of the taste.

Inspired by and adapted from my favorite hummus recipe, which you can find here.


Hollylujah Hummus Recipe

Ingredients

  • 1 can garbanzo beans/chickpeas, rinsed and drained
  • 1/4 cup tahini
  • 1/4 cup lemon juice
  • 1 clove garlic, minced
  • 1/2 tbs. olive oil
  • 1/2 tsp. sea salt
  • 1/2 tsp. cumin
  • 3-5 tablespoons low-sodium vegetable broth or water
  • a few dashes of paprika (optional)

Method

  1. Begin by blending the lemon juice and tahini in a food processor or blender. Scrape the sides between blending to keep everything evenly mixed.
  2. Add the garlic, olive oil, salt, cumin, and 3 tbsp. of broth or water and blend a few more times, scraping in between.
  3. Slowly add the garbanzos/chickpeas and continue to blend, adding more broth or water to reach the desired consistency.
  4. Serve with a few dashes of paprika if desired!


Roasted Kale Chips Recipe

Kale is one of those vegetables that can do no wrong. It's both nutrient-dense and versatile in recipes. My personal favorite uses are to either steam it and cover it with sauces and stews, or dehydrate/bake it into a crispy chip. Today I'll be sharing a quick and simple way to make a crunchy side dish of kale while you're preparing a meal. All you need is some kale, and any oil/seasonings that you like. This recipe is oven-baked, but stay tuned if you have a dehydrator, I have plenty of kale recipes for that!

Roasted Kale Chips Recipe

Ingredients (Serves 4-6)

  • 1 bunch kale, de-stemmed and cut into small pieces
    • I often use a bag of trader joe's organic tuscan kale, as I did in this post. Even with ready-to-go kale, however, you can de-stem a little further if you want just the leaves. I skipped that step this time, but I do it when I have more time, and recommend it!
  • Just enough oil to coat the kale, about 1/2 - 2tbs.
    • I often use olive oil, sometimes sesame or coconut when I'm going for a different flavor. Any oil will do!
  • Seasonings to taste 
    • I just used sea salt and crushed pepper today. I've done this with lemon pepper, sesame seeds, a little lemon or lime juice, 

Method

  1. Preheat oven to 250° F. (You can do 300° F or possibly higher if you're in a hurry or baking something at a different temp, just be prepared to check the oven often to avoid burning.)
  2. Prepare your kale, and toss in a bowl with the oil and seasonings until coated evenly. I use my Misto sprayer to use as little oil as possible while still evenly coating the chips. That's why I'm not sure exactly how much I'm using :)
  3. Spread the kale evenly on a baking sheet or two, and bake for 15-20 minutes until crispy. Check the oven often and rearrange the chips if necessary to insure even baking. The exact time will depend on your oven, the temperature you bake it at, and how much oil you used, so the first time you make these you'll figure out what works best for you.
  4. When they're done, remove from the oven and enjoy immediately! If you manage to have any leftovers, store them in the refrigerator and reheat in the oven at 200° F. 


I made these while I cooked Happy Herbivore's Caribbean Sweet Potatoes (which is one of my favorite recipes for using up apples). That recipe is from Everyday Happy Herbivore, which can be found here.

Have a beautiful Sunday!

Chickpea Salad from Adventuresome Kitchen

Happy 4th of July! I hope you're all enjoying a nice relaxing day off with friends and family.

I'm headed to a potluck today, and found myself without a recipe last night. I texted some friends in a panic and told them I was thinking about a chickpea salad, and my lovely friend Jessica came to my rescue with this link. It was a miracle! I actually had almost everything on hand, and only needed to run to the store for a few things this morning. So this post is dedicated to Jessica, for saving my 4th of July :)


As usual, I made a few modifications (less oil, mostly!) to the recipe, which I'll explain in this post, but you can head over to Adventuresome Kitchen for the original recipe if you like.


Chickpea Salad (adapted from Adventuresome Kitchen)

Ingredients (Serves about 10)

  • 4 cans chickpeas (garbanzo beans) drained
  • 1 large sweet potato, peeled and diced into cubes
  • 1 large red onion, diced
  • 1 pint of cherry tomatoes, halved
  • 1 bag, or several bunches of spinach, torn into smaller pieces
  • 2 1/2 tbs extra virgin olive oil
  • 1/4-1/2 cup vegetable broth or water
  • 3 tbs red wine vinegar
  • 1 tbs dried rosemary
  • 1 tbs herbes de provence
  • salt and pepper to taste

Method

  1. Preheat the oven to 350° F. Dice the sweet potato and onion. Place in a large bowl with 1/2 tbs oil and stir.
    Place on a parchment paper-lined cookie sheet and sprinkle lightly with salt. Cook until softened - about 30 minutes.
  2. Drain chickpeas and place in a large bowl. Add tomatoes. When the sweet potato onion combo has finished cooking, add to the bowl.
    I had a few different brands of chickpeas lying around. Can you see the color difference?
  3. Place the torn spinach and 1/4 cup vegetable broth into a large pan and heat over medium heat. Saute until the greens are barely wilted- about 2 minutes, adding more liquid if necessary. Add to the bowl.
    Magically shrinking spinach
  4. Whisk together the remaining 2 tbs oil, red wine vinegar, and herbs, and pour over salad.
  5. Using a large spoon, gently toss all the ingredients together.
  6. Salt and pepper to taste, and enjoy!

We'll be heading to the potluck with this, some blue corn chips and salsa, and a red summer wine. Hope you have a beautiful day!

Nutrition (Per 1 1/4 cup serving)


  • Calories: 219
  • Total Fat: 6.7 g
    • Saturated: 0.5 g
    • Polyunsaturated: 0.4 g
    • Monounsaturated: 2.5 g
    • Trans: 0 g
  • Cholesterol: 0mg
  • Sodium: 430.5 mg
  • Potassium: 219 mg
  • Carbs: 37.9 g
    • Fiber: 12 g
    • Sugars: 4.6 g
  • Protein: 9.8 g
  • Vitamin A: 114.7%
  • Vitamin C: 18.8%
  • Calcium: 9.5%
  • Iron: 41%

Homemade Almond Milk Recipe

On this throwback thursday, I'm updating a post I wrote for Urban Remedy last year. This predates my DSLR, so please forgive my shoddy iPhone photography and enjoy!

A Great Source for Non-Dairy Milks: Your Kitchen


Non-dairy milks are wonderfully versatile. They are delicious in smoothies, juices, baked goods, or over your morning granola. Not all store-bought alternatives are completely safe, however, and some contain ingredients that are worth mentioning.

When you read a non-dairy milk label, most of the foreign ingredients you see are added vitamins and minerals. However there is one common ingredient that should raise considerable alarm.

Carrageenan, a seaweed derivative, is commonly used as a thickening agent, stabilizer, or emulsifier in many non-dairy products. It may sound harmless, but recent research from the Cornicopia Instutite has linked carrageenan to a number of digestive issues, including colon inflammation and cancer, in animals.

Since it can be difficult and time-consuming to find products without carrageenan, the Cornucopia Institute has created a helpful shopping guide.

If you want the freshest, most natural non-dairy milk possible, a great option is to make it yourself. It is surprisingly simple to make your own non-dairy drinks, using nuts, seeds, or grains.

How to Make Your Own Nut Milk

This is a simple recipe for homemade nut milk, using only nuts, water, and a blender (and a few other optional items). You can get creative and try this with any nut or seed, even a combination!


  • Soak one cup of nuts (almonds are a popular choice, but any nut or blend of nuts will do) in water for at least 8 hours, or overnight.
  • This is optional, but you may want to blanch (remove the skins) if you are using almonds or hazelnuts. This can improve the taste and texture of your milk, but is not required.
  • Drain the nuts completely. Combine with 2-3 cups of water in a blender or food processor, and mix until that familiar creamy color is achieved. If you prefer some extra flavor or sweetness, you can try adding a bit of sugar, dates, vanilla, and/or cinnamon before you blend.

Homemade almond milk: before and after blending (using unblanched almonds)

  • You can use cheesecloth, a fine mesh strainer, or a convenient nut milk bag to strain the milk.

A nut milk bag.
A nut milk bag is a fine mesh bag that you pour your milk through and squeeze to drain. This is the easiest way to separate your milk from the pulp, which you can then save for other recipes*. It helps if you have a large funnel as well, which allows you to squeeze your milk directly into the container you will store it in.

Bottle it up and refrigerate. Be sure to shake your new milk well before using, and use within 7-10 days.

It’s that simple. You’ll have complete control over what you are drinking, and you can make just the amount you need. It’s a dairy-free miracle.


*I always save the pulp from my almond milk and dehydrate it to make almond flour, vegan parmesan, and use in place of bread crumbs in recipes. I'll write about that soon!

Quinoa Tabbouleh Recipe

I have a bit of an obsession with tabbouleh. It's a middle eastern salad made with a refreshing combination of fresh parsley and mint, tossed with lemon juice, tomatoes, and bulgur wheat. As a vegan I like to pack in a little more protein wherever I can, so I prefer to make it with my favorite superingredient, quinoa.

I've tried several different recipes for quinoa tabbouleh that I've found online, but the one from Epicurious is by far my favorite. Recently I've made some changes to it to make it a bit healthier and easier to prepare. 

Behold: a nutritious, delicious summer salad that you can grab and take anywhere. You can substitute the cucumber or add just about any of your favorite salad veggies here, and it's also great served over shredded romaine lettuce (might want to make more dressing, though).

Hello, I'm delicious.

Quinoa Tabbouleh Recipe (adapted from Epicurious.com)

Makes 6 servings

Ingredients

  • 1 cup dry quinoa
  • 1 pint cherry tomatoes, halved
  • 1 large cucumber or 2-3 small, sliced into half moons
  • 1/2 red onion, diced
  • 2 tbsp lemon juice
  • 1/4 cup (4 tbsp) olive oil
  • 1/4 cup (4 tbsp) low-sodium vegetable broth (or water)
  • 1 garlic clove, minced
  • 2/3 cup flat-leaf parsley
  • 1/2 cup fresh mint
  • 1 tsp lemon pepper seasoning (optional)
  • Salt and Pepper to taste

Method

  1. Thoroughly rinse the quinoa in a fine mesh strainer. This step is very important to remove the bitter coating.
  2. Cook the quinoa in 1 1/2 cups water and a few dashes of salt. I like to make mine in a rice cooker, but a pot works too. Stir frequently to prevent burning, and cook until the water is absorbed and the quinoa is tender, roughly 10-15 minutes. 
  3. Set aside in a large bowl until cooled to room temperature, and then refrigerate. I like to prepare my quinoa several hours or even a day in advance, so that it is fully chilled when I prepare the rest of the tabbouleh.
  4. Add chopped tomatoes, cucumber, and onion to chilled quinoa.

  5. Pick leaves from parsley and mint and add to blender. A mini blender works great if you have one, but a large one will do. You can also just chop the herbs and then stir in the liquids.
  6. Add the olive oil, vegetable broth (or water), garlic, lemon pepper, salt and pepper to the blender. Pulse a few times until the herbs are finely chopped (but not pureed) and the ingredients are all well mixed.

  7. Pour the dressing over the salad and stir to combine.

  8. Eat joyously.
That's a happy bowl.


Nutrition (Per 1 1/2 cup serving)

  • Calories: 314
  • Total Fat: 16.3 g
    • Saturated: 2.1 g
    • Polyunsaturated: 2.5 g
    • Monounsaturated: 10.9 g
    • Trans: 0 g
  • Cholesterol: 0mg
  • Sodium: 371.2 mg
  • Potassium: 644.7 mg
  • Carbs: 37.8 g
    • Fiber: 4.4 g
    • Sugars: 3.8 g
  • Protein: 7.1 g
  • Vitamin A: 26.1%
  • Vitamin C: 53%
  • Calcium: 7.3%
  • Iron: 29.9%

Special thanks to my friend Nena for taking some of the photos for this post.
You can check out her blog here.


Black Bean Tofu Scramble

I love to cook, and while I frequently make modifications to recipes, I very rarely create my own from scratch. This morning I decided to make an exception and throw together a tofu scramble with what I had lying around. The result was a very versatile recipe that can easily be adapted to suit whatever is currently in your kitchen!

I had one half of a twin pack of organic sprouted tofu from Trader Joe's, some veggies, spices, and an onion. Here's what I came up with:


Ingredients (fills 8 tortillas)

  • 1 tbsp olive oil (or 1/4 cup water or vegetable broth, if you are limiting fats)
  • 1/2 onion, diced (roughly 1 cup, and I used red)
  • 2/3 cup bell pepper, chopped (any variety, I used a frozen mix)
  • 1 jalapeño, diced (optional, and can be seeded to lower heat - but I like it spicy!)
  • 1 clove garlic, minced (I adore frozen Dorot cubes)
  • 7.5 oz tofu, drained and pressed
  • 1/2 can black beans, rinsed and drained
  • 1/2 tsp cumin
  • 1/2 tsp turmeric
  • 1/2 tbsp chili powder
  • salt and pepper (or other seasonings) to taste
  • Tortillas
  • Your favorite salsa (Mine is Trader Joe's habanero and lime) 
  • Toppings of your choice (spinach, tomatoes, avocado, cilantro, etc!)
This recipe can easily be doubled if you have more tofu and veggies on hand, and most anything can be tweaked to suit your tastes.

Method

  1. Drain the tofu and slice into 1-2 inch thick slabs. Set a few layers of paper towels on a plate, lay the tofu on top, and cover with more paper towels and another plate. This will "press" the tofu and the paper towels will absorb any excess moisture. Let this sit for a few minutes while you prepare the other ingredients.


  2. Discard the paper towels and mash the tofu with a fork, until crumbly.
  3. Heat the oil (or substitute) in a large pan over medium heat. Add the onion, peppers, garlic, jalapeño (if using), and a few dashes of salt. Saute for 2-3 minutes.

  4. Add the tofu, spices, and black beans and stir to combine. Cook for another 3-5 minutes, then remove from heat and season to taste.

  5. Warm the tortillas with your preferred method (I like heating them straight over a flame)

  6. Fill each tortilla with scramble and top with salsa. Then add whatever other toppings you like! I chopped some spinach and cherry tomatoes, but I can't wait to try this with avocado!

Want to try this recipe? Have any questions or suggestions? Let me know in the comments!


Nutrition (Per 1/8 serving, scramble only)


  • Calories: 78
  • Total Fat: 3.4 g
    • Saturated: 0.6 g
    • Polyunsaturated: 0.2 g
    • Monounsaturated: 1.3 g
    • Trans: 0 g
  • Cholesterol: 0mg
  • Sodium: 160.5 mg
  • Potassium: 46.7 mg
  • Carbs: 8.1 g
    • Fiber: 2.2 g
    • Sugars: 1.4 g
  • Protein: 4.6 g
  • Vitamin A: 12.2%
  • Vitamin C: 34.9%
  • Calcium: 7.5%
  • Iron: 6.3%