• Superfood Salad and Skin Treatment

  • Hollylujah! Onion Rings

  • Healthy Pad Thai

  • Zucchini Pasta with Walnut Pesto

Thanksgiving Reflections, 2014 Edition


Thanksgiving 2014 was another great one, and I'm still feeling the glow days later. My parents came up for the second year in a row, and we shared a plant-based Thanksgiving feast that I have been planning for weeks.


I shared my menu a few weeks ago, and there were only a few changes since then. In the end it was all vegan, gluten-free (except the rolls), and refined-sugar free (stevia and maple syrup in the pie). Here's how it all turned out:

Autumn Kale Salad

Fall is my favorite produce season - I love picking up persimmons and pomegranates at the farmer's market. This year my Thanksgiving salad mixes those flavors with other autumn staples like pumpkin seeds and cranberries. The result is a tender, crunchy, sweet and savory salad that will give you plenty to be grateful for.


Kale salad with quinoa, persimmons, pumpkin seeds, cranberries, and a pomegranate vinaigrette

Serves 4-ish

Ingredients

For the salad:
(I didn't measure this part. These are approximate amounts and don't need to be exact, so adjust to your preference and what you have on hand)
  • 1 large bunch kale, stems removed and torn into pieces (or a prepared bag - but lose those pesky stems)
  • 1/2 small shallot, thinly sliced
  • 1/4 cup pepitas, lightly toasted
  • 1/4 cup dried cranberries
  • 1 ripe fuyu persimmon, peeled and sliced into half-moons
  • 1/2 cup cooked quinoa
  • Pomegranate seeds (optional, but probably perfect)
For the dressing:
(There will be extra, so you can be generous with the dressing, make more salad, or half the ingredients for the dressing if you want to keep it light)
  • 1/4 cup 100% pomegranate juice (juice it yourself or buy it - but make sure it is 100% pomegranate juice with no added juices or sugars)
  • 1/4 cup balsamic vinegar
  • 1/3 cup extra-virgin olive oil
  • 1/4 teaspoon salt
  • 1/2 teaspoon freshly ground black pepper

Method

  1. Put kale into large bowl
  2. Whisk together salad dressing ingredients and pour a small amount into the kale (use your own judgement/preference here, but enough to moisten all of the leaves).
  3. "Massage" the dressing into the kale until it is tender and just wilted. You may want to wear gloves or plastic bags over your hands for this.
  4. Add the remaining salad ingredients and toss, adding more dressing if desired (or serve it on the side).
And there you have it. Happy Thanksgiving!

Throwback Thursday: Last Thanksgiving


Thanksgiving is only a week away, and I'm getting so excited! I'm in the final planning and prepping stages for this year, and reflecting a bit on how things went the first time around.

Hollylujah's original incarnation is still out there, and its only two posts were about last year's Thanksgiving. This post explained my crafty pumpkin place cards, and this post was a roundup of how each recipe turned out.

Here are some photos from the day:


Homemade pumpkin spice lattes (vegan, natch)

Craftiness

The setup

Pumpkin candle holders = <3

Kale salad with delicata squash and all kinds of other goodness

Roasted green beans with cranberries and walnuts

It was pretty delicious if I recall.
Chocolate brownie pumpkin pie with crunchy pecan topping and maple coconut whipped cream. Say that 3 times fast.

My parents, ladies and gentlemen.
Good times :)

If you're interested in trying any of those recipes, they were all linked on the old blog. Last year was so wonderful, and one of my favorite memories ever. I can't wait to do it again!


My Thanksgiving Menu (first draft, anyway!)

Hello! It's been a while. I've missed blogging, but some other things have been taking up my time.

For example, we rescued a bunny in August and she's been the center of my world ever since. She's a sweet, silly, and shy little lop with helicopter ears (one up and one down - the cutest thing ever). We named her Penny Lane, and spoil her rotten. There will probably be some posts about her in the near future, actually. But for now, just look at that cute face!

I've also been really busy chipping away at my last semester of college EVER. Only another 5 weeks or so until I'm a college grad! It's an exciting, slightly terrifying, and definitely busy time.

In between all that and more, I've still been cooking up a storm, and I'll have quite a few new recipes to share soon.

This month, however, my focus is delightfully directed toward Thanksgiving, as once again I am hosting this year! (There will probably be some flashback posts soon about the menu and decor from last year - they were on a different blog.)

I have been pinning and organizing the potential recipes for weeks, and today I may just have finalized the menu. I recently eliminated wheat and refined sugars from my diet, so had to factor that into the planning process, and I managed to create a menu that works! So without further adieu, here is a 100% vegan, gluten-free, refined sugar-free Thanksgiving menu that I can't wait to bring to life:

Main Course: Thanksgiving Meatless Loaf from FatFree Vegan Kitchen. After 3 blissful years of ordering the Native Foods Wellington (a puff pastry filled with meaty seitan, yams, kale, and stuffing and topped with what is arguably the best mushroom gravy in existence), we decided to go our own way this year (plus, the wellington has tons of wheat). We chose a meatless loaf that doesn't pretend to be meat. It's full of vegan staples - beans, tofu, veggies - delicious thanksgiving herbs and spices, and looks like it will be completely perfect when slathered in mushroom gravy. Speaking of which...

Gravy: Happy Herbivore's Everyday Mushroom Gravy - Quick fangirl moment - Lindsay Shay Nixon is by far my favorite plant-based cookbook author (and idol). She's a pro at creating recipes that are as simple as they are delicious, and her compassionate "progress not perfection" approach to the vegan lifestyle is a refreshing change of pace. Anyway! I'm not sure if this simple gravy recipe is anywhere online, but it can be found in two of Lindsay's books, Everyday Happy Herbivore and Happy Herbivore: Holidays and Gatherings (which is new this year and also the source of another recipe I plan to try - fangirling over!)

Stuffing: Southern Cornbread Stuffing from Food to Glow - When I asked my boyfriend if he had any special requests for Thanksgiving (which also falls on his birthday this year), he suggested cornbread. So when I realized I also had to start looking for a wheat-free stuffing recipe, this was a no-brainer. This recipe was the first to pop up in my search, and it had me at hello - I think it's going to be the home run recipe of the year.

Salad: This is going to be my original recipe, so look for that post in the next few weeks once I get it right. But it will be a kale salad with plenty of autumn accents.

Other side dishes: Garlic/rosemary mashed potatoes, simple roasted green beans, and Happy Herbivore's sweet potato casserole from her new holiday book.

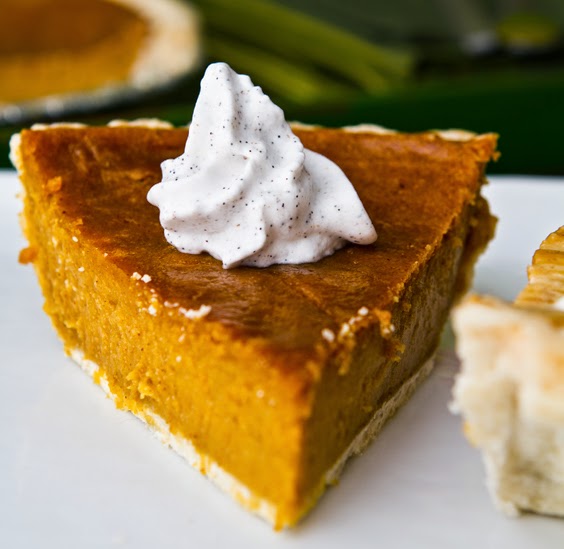
Dessert: GF Maple-Nut Pumpkin Pie. I'm trying a hybrid of this simple pie filling made with cashews and this gluten-free crust made with pecans, and topping it all off with the maple coconut whipped cream that we loved last year. Making some small changes to make the recipes work together, and to work with my current diet, but I'm excited to see how this turns out.

And there you have it! I couldn't be more thrilled to make and eat all of this in a few weeks. What new recipes are you trying this year?

Cheesy Vegetable Kale Chips

Those delicious cheesy kale chips you can buy at the store are delicious and oh-so-healthy, but at about $5 a bag they are quite an investment. This is a pretty easy batch you can whip up for about half the price, yielding about 3-5 times as many chips. SCORE!

(If you want a simpler, faster roasted kale recipe without all of the cheesiness, I gotcha covered too)

This recipe is super fleixble. You can make them in the oven or dehydrator, using a blender or food processor, and you can even mix up the ingredients if you want. Swap lime juice for the lemon and squirt in some sriracha sauce. Use sun dried tomatoes instead of a carrot. Go nuts and be creative and enjoy the magical disappearing act that follows (read: these taste great and you will eat them quickly).


Onward to the recipe!

5 More Kitchen Tools I Love


I did a post a few weeks ago on 5 of my favorite kitchen gadgets, but I knew I couldn't stop there. Here are 5 more tools I use (and love) in my kitchen:

  1. These gorgeous knives: I've had this Farberware Resin 3-Piece Set for over a year now, and still adore it. At the time I just needed a decent, affordable set of knives to hold me over until I could splurge on something more substantial, but they are holding up better than expected. It's fun to have knives as colorful as the vegetables they are chopping, and the resin coating is standing the test of time. Bonus: they come with individual sheaths to spare you from accidental cuts when storing them in a drawer.
  2. This enormous measuring cup: I was just looking for a regular 2-cup measuring cup when I stumbled upon this massive 8-cup one, and then I realized how often I'm measuring in quantities larger than 2 cups. So I bought both this one and a smaller one, and I no longer need to refill my little cups when I'm working with big portions. 
  3. The most versatile funnel: This 4-piece set can be adapted to any of your needs, and it's crazy awesome. I love to use all three funnel pieces when I'm making almond milk, so I can squeeze the nut milk from the bag right into a tiny bottle. The uses are endless. And bonus: it comes with a strainer attachment! Betcha didn't know funnels could be this good.
  4. This fancy corkscrew: My first corkscrew was cheap and seemed to destroy my wine corks or not fit over the bottle half the time. I decided it was time to find something more sophisticated, and  this one is the best deal around. It has a built-in blade to perfectly remove the foil at the top of the bottle, and then all you do is position the corkscrew over the top of the bottle and rotate the handle. In one motion it grabs the cork and removes it, flawlessly every time. It's a bit hit at parties.
  5. This bamboo kitchen tool set: I love to cook with wooden spoons and spatulas. They are sturdy like metal, but soft like plastic, yet they won't melt or scratch the pan. I got this set about a year ago, and it's fantastic. Very easy to use and clean. 

All images from Amazon.com


Hollylujah! Onion Rings

There's a burger spot in our neighborhood with vegan options, and my boyfriend and I like to go there after an active day, or when we're simply feeling indulgent. I love their vegan and portobello burgers, but their onion rings are the BEST, and probably the reason we go about once a month. They're beer-battered and deep fried and probably not even vegan though, so I've been jonesing to come up with a healthier alternative to make at home.

The idea to make them with almonds was always there, in order to lower the carbs and make the fats healthier. But I started off a bit over-zealous, planning to make the almond milk at home and dehydrate the leftover almond crumbles to turn into almond flour and a crunchy coating. This is exactly what I did, but it took forever, so next time I will probably simplify a bit. :) In fact, I have come up with a simple method, so I will share all of your options in this post, depending on where you fall on the zealous-ometer.

Note: I will continue to tweak this recipe and add more photos and an instructional video. But if you can't wait, give it a go!


On to the recipe...

Recipes of the moment: Jul 24

While I do have some exciting new recipes in the works this week, in between I've been trying some recipes from other bloggers in between. Here are two of recipes I'm trying at the moment:

  1. Yesterday I made my first batch of homemade coconut bacon, using this recipe from The Simple Veganista. It tastes eerily like bacon (granted, I haven't had the real thing in at least 5 years, but STILL). It's delicious, and dangerously addictive.
    Coconut Bacon

    It also made a great BLTA with hummus and red onions, which made quite a splash on instagram yesterday for some reason. I guess people can't resist a pretty sandwich!
  2. Yesterday's lunch: the BoLThA?
  3. Today I'm making a batch of raw portobello jerky, courtesy of Choosing Raw. The idea for this struck me when I was enjoying the meaty texture of my recent marinated portobello burgers. When I started my research, this recipe looked so much like what I wanted to create that I decided to just go with it. I marinated the sliced caps last night and they are currently in the dehydrator. The house is smelling SO smoky and jerkylicious as I type :)
    Raw portobello mushroom jerky
Today I'll be refining my healthy onion ring recipe, and assuming nothing goes horribly wrong, that recipe should be here tomorrow! Stay tuned!

To be continued...


Healthy Pad Thai? YES.

Hello hello! I am back from a wonderful visit in Los Angeles with friends and family. I was anxious to get back to cooking, so I stopped at the store on my way back into town and stocked up on a bunch of fresh ingredients to fill my week with new recipes. Among them was a spaghetti squash and some powdered low-fat peanut butter, both of which were calling me the next day when I was craving pad thai.

Pad thai is delicious, but never really considered healthy, so I was on a mission to reduce the guilt of this incredible dish as much as possible. Using baked spaghetti squash instead of rice noodles cuts the carbs down by about 30g per serving, and by using powdered peanut butter, the fat is reduced by 85%.

Here's a nutritional comparison for this recipe vs the same exact one prepared with regular peanut butter and rice noodles:

This recipe: 135 calories, 3g fat, 21.1g carbs (full nutrition facts at the end of this post)
Traditional: 430 calories, 16.7g fat, 55.9 carbs

The numbers don't lie. Onward to the recipe!


Lentil Walnut Burgers/Ninja Nuggets

The last few days before a vacation are a great opportunity for creative cooking. As I attempt to empty my fridge and pantry without having to buy more groceries, I always seem to discover or create new recipes that I continue to experiment with when I return.

I'm leaving for LA tomorrow, and I've already cleared out most of my perishables (hence the lack of exciting new recipe posts!), so I found myself experimenting with dry ingredients yesterday. I had a particular abundance of lentils and walnuts, so I started searching for a new burger recipe.

Enter Oh She Glows, one of my absolute favorite blogs, with a Lentil Walnut Burger recipe for which I had everything on hand. SOLD!

They look a bit like cookies, but they are delicious savory burgers, I promise!
I followed the recipe exactly, with one main exception: I didn't have bread crumbs. I had corn flakes, which I usually use as a substitute anyway, but I had something else I had been meaning to use up that would be perfect: almond pulp! This is the by-product of making almond milk: dry, crumbly almond bits that can be ground into almond meal or flour, and, so I've heard, used in place of bread crumbs in recipes. It's incredibly versatile stuff, so I like to keep it around.

So since that's the only sub I made, you can grab the recipe here, and substitute the bread crumbs, or not. The almond pulp worked great, and the recipe held together really well.


Oh, that brings me to this other thing I tried...I got these ninjabread men cookie cutters a while back, and have been meaning to use them. Since the batter was so solid and cookie dough-like, I molded some of it into ninjas. :) Ninja nuggets! I'm going to have to play with this idea a bit more and bread them next time. These were way too much fun to play with...

This is what happens when you put all of your ninja nuggets on the same plate...

And that's it! I'm off to pack for LA, and hopefully I'll have some delicious new posts for you while I'm gone. Have a great week!

Graphic: How to cut an avocado (without peeling!)

It's been a busy few days, so most of my meals have been quick and on the run. No new recipes worth posting, but maybe I'll share a roundup of my quick meal staples soon. One of those quick meals was a tomato and avocado salad, which required a quick dicing of this avocado without making a mess. Here's how I do it, with a handy Pinterest-friendly graphic:

  1. Start with a sharp knife and a ripe avocado.
  2. Slice off the tip and cut the avocado around lengthwise.
  3. Twist and separate the halves.
  4. Remove the pit with the knife.
  5. Gently dice or slice the avocado right in the skin.
  6. Scoop out the pieces with a large spoon.
  7. Enjoy!

I don't think this is the best or only way to do it, but it certainly is my favorite. How do you like to cut your avocado?


Marinated Portobello Burgers Recipe

My adventures in creating recipes from farmer's market finds continue...

There was a mushroom stand on Sunday with baskets of various mushroom varieties, all marked at $5 a basket. There was only one portobello basket left, and it was mine. I knew right away that they would become burgers, so all that was left was to decide on a marinade. Here's what I came up with...

Why I put the lettuce on the bottom, I'll never know.
Onward to the recipe!

Mediterranean Grilled Veggie Bowl with Tahini Sauce

I was a bit tired last night and trying to come up with a last-minute dinner that could use the leftover zucchini from this pasta, as well as the red pepper and eggplant I got at the farmers market on Sunday. I found this recipe, which I could make with a few substitutions, so I went for it. It is absolutely delicious and I suggest you try it if you enjoy mediterranean flavors. Rather than retype the recipe (maybe I'll update it later, but I don't have time today), here are the substitutions I made:


Mediterranean Grilled Veggie Bowl with Tahini Sauce (Adapted from Chow)

(Click the link if you want the original recipe, these are only the changes I made)
  • I didn't have roasted tahini, so I ground up some roasted sesame seeds. It was about 2 2/3 tablespoons to make 2 tablespoons of packed sesame seeds, and I just blended that right into the lemon juice and olive oil for the dressing. I also forgot the garlic, but didn't notice, and it was still fantastic.
  • I didn't have a shallot, so I used up 1/3 of a red onion I had leftover from a different recipe.
  • I used Trader Joe's Harvest Grains Blend instead of just couscous, because it's what was in my pantry. It's mostly couscous, but with a orzo, garbanzo beans, and red quinoa mixed in. Upgrade!
  • I also grilled up the leftover inside chunks of zucchini from yesterday's pasta adventure.
  • I sprayed the vegetables with my misto instead of brushing them, but who knows if this used less oil in the end. I sprinkled them with lemon pepper instead of just salt and pepper. It tasted very lemony (but not overly so) in the end, which I love.
  • Grilling took forever because I have a george foreman grill, but hopefully that helped with the oil problem.
  • I also didn't have fresh parsley, so I threw in a tablespoon and a half of dried.
The result was so delicious, it was addictive, and I had to fight the urge to eat the rest right out of the pan. It was the perfect end to an exhausting day.


Not a very exciting post for today, but I promise I'll make it up to you tomorrow with marinated portobello mushroom burgers! :)

Zucchini Pasta with Walnut Pesto (low-carb and low-calorie)

I had a pretty great Sunday. It started with my first-ever Zumba class and swimming with my good friend Nena (whose awesome Tech blog you can find here, btw). Afterward, there happened to be a farmer's market in the parking lot, so we got some cash and went produce hunting. I scored on a lot of goodies that will be sure to inspire many new recipes this week. Here's my loot:

GET IN MAH BELLY
Inspired by the unhealthy hummus we found there, we went back to my house and made the hummus that I posted yesterday, and then I started to think about what else I could make this week. I got some extra long zucchini that would make great noodles, and so much basil would have to become pesto. So yesterday afternoon I got to work, determined to make a delicious new pasta dish that would be as healthy as possible.

If you've never made zucchini noodles, you're missing out. Cooked just a little, zucchini closely resembles the texture of pasta, and when you add some sauce you can hardly tell the difference. It makes a great lasagna noodle as well. 

To cut the noodles, a special slicer is ideal. I have a mandoline slicer (this one) that can make julienned strips, but this spiral slicer is officially on my wish list. If you don't have the appropriate slicer or the cash to splurge on one right now, you can use a vegetable peeler to create long, flat, linguine-like shreds. I don't recommend just using a knife for this, though. I tried it once, and the results were not worth the time and effort required.

Whether you peel the zucchini first is up to you - it's really just a question of aesthetics and nutrition. The skin adds a bit more color and fiber, but I'd recommend peeling your zucchini if it isn't organic, to reduce your chemical intake. However you choose to slice your noodles, stop when you get to the seeds. I like to save the insides for other recipes - they're good grilled! :)

If you want more info on the various ways to prepare zucchini noodles, check out this thorough Wikihow article

Ummm, hi.

Onward to the recipe!

Hollylujah Hummus

Hummus, you know I love you. You're the perfect dip and sandwich spread, you are a delicious and easy source of protein, but we've got to talk. You're packed with oil, and everyone knows it. You're not fooling anyone. What we have is beautiful and I don't want it to end, but just hope I can change you, so that I can enjoy you without all of the guilt.

Turns out hummus is pretty flexible. Check out this new and improved version of my love, with a quarter of the oil, half the salt, and all of the taste.

Inspired by and adapted from my favorite hummus recipe, which you can find here.


Hollylujah Hummus Recipe

Ingredients

  • 1 can garbanzo beans/chickpeas, rinsed and drained
  • 1/4 cup tahini
  • 1/4 cup lemon juice
  • 1 clove garlic, minced
  • 1/2 tbs. olive oil
  • 1/2 tsp. sea salt
  • 1/2 tsp. cumin
  • 3-5 tablespoons low-sodium vegetable broth or water
  • a few dashes of paprika (optional)

Method

  1. Begin by blending the lemon juice and tahini in a food processor or blender. Scrape the sides between blending to keep everything evenly mixed.
  2. Add the garlic, olive oil, salt, cumin, and 3 tbsp. of broth or water and blend a few more times, scraping in between.
  3. Slowly add the garbanzos/chickpeas and continue to blend, adding more broth or water to reach the desired consistency.
  4. Serve with a few dashes of paprika if desired!


Roasted Kale Chips Recipe

Kale is one of those vegetables that can do no wrong. It's both nutrient-dense and versatile in recipes. My personal favorite uses are to either steam it and cover it with sauces and stews, or dehydrate/bake it into a crispy chip. Today I'll be sharing a quick and simple way to make a crunchy side dish of kale while you're preparing a meal. All you need is some kale, and any oil/seasonings that you like. This recipe is oven-baked, but stay tuned if you have a dehydrator, I have plenty of kale recipes for that!

Roasted Kale Chips Recipe

Ingredients (Serves 4-6)

  • 1 bunch kale, de-stemmed and cut into small pieces
    • I often use a bag of trader joe's organic tuscan kale, as I did in this post. Even with ready-to-go kale, however, you can de-stem a little further if you want just the leaves. I skipped that step this time, but I do it when I have more time, and recommend it!
  • Just enough oil to coat the kale, about 1/2 - 2tbs.
    • I often use olive oil, sometimes sesame or coconut when I'm going for a different flavor. Any oil will do!
  • Seasonings to taste 
    • I just used sea salt and crushed pepper today. I've done this with lemon pepper, sesame seeds, a little lemon or lime juice, 

Method

  1. Preheat oven to 250° F. (You can do 300° F or possibly higher if you're in a hurry or baking something at a different temp, just be prepared to check the oven often to avoid burning.)
  2. Prepare your kale, and toss in a bowl with the oil and seasonings until coated evenly. I use my Misto sprayer to use as little oil as possible while still evenly coating the chips. That's why I'm not sure exactly how much I'm using :)
  3. Spread the kale evenly on a baking sheet or two, and bake for 15-20 minutes until crispy. Check the oven often and rearrange the chips if necessary to insure even baking. The exact time will depend on your oven, the temperature you bake it at, and how much oil you used, so the first time you make these you'll figure out what works best for you.
  4. When they're done, remove from the oven and enjoy immediately! If you manage to have any leftovers, store them in the refrigerator and reheat in the oven at 200° F. 


I made these while I cooked Happy Herbivore's Caribbean Sweet Potatoes (which is one of my favorite recipes for using up apples). That recipe is from Everyday Happy Herbivore, which can be found here.

Have a beautiful Sunday!

5 of my most-used kitchen gadgets

The more I cook, the more unique cooking gadgets seem to accumulate in my kitchen. Some have been impulse purchases for which the novelty has worn off over time, and others have become essential tools in my kitchen arsenal. This post will focus on the latter: my favorite kitchen gadgets that I can't live without.

My five well-worn gadgets of the day.
  1. Mandoline slicer: If you do a lot of chopping and don't have a mandoline slicer yet, take a moment to ponder how much precious free time you have wasted on unevenly slicing vegetables. Don't worry, I didn't know what I was missing either. I bought my first mandoline slicer about 4 or 5 years ago when I decided to start making veggie chips and needed a super-thin, even cut. The one I bought has 6 settings, ranging from thick to super-thin slices, 
    as well as two mandoline cuts. I use it for everything. Beware of cuts, however, and consider investing in some cut-resistant gloves if you're clumsy like me (and refuse to use the included finger guard). Here's a link to the latest version of the mandoline slicer I bought (pictured below being dangerously used by me).
  2. My mandoline slicer in action while I made Quinoa Taboulleh
  3. Handheld juicer: So many recipes call for lemon or lime juice, and nothing beats fresh squeezed. A handheld juice press is the most efficient, simple option for juicing citrus fruits in small quantities, so it's a must have. I have this one, which is really affordable, but if you can afford to splurge, this fancy one looks like it can squeeze out every last drop.

    My juicer in action
  4. Nut milk bag: Did you catch my recent #TBT post on making your own nut milk? If you want to get serious about making homemade milks, a nut milk bag is the only way to go. You can try to drain your milk with cheesecloth or a fine mesh strainer, but that will either leave some liquid behind or a grainy texture in the milk (ick!). But with a nut milk bag, you can easily squeeze all of the milk you created, leaving all of the pulp behind. The experience is oddly similar to milking a cow, which I've never actually done, but I imagine this is the vegan equivalent. If that description wasn't too weird for you, check out this affordable nut milk bag and try it for yourself.
    My nut milk bag
  5. Mini blender: For blending jobs too small to warrant the use of a blender or food processor, there is nothing quite like a mini blender. Cleanup is easy and the uses are endless. Most come with both a blending and grinding blade, and several differently sized cups. I have the Magic Bullet, but hear great things about the Nutri Bullet as well.
    My mini blender making the dressing for Quinoa Taboulleh
  6. Goggles: I've been using goggles to chop onions way before Phil did it on modern family. My eyes are extremely sensitive and no other trick has worked to keep them tear-free while I cook. I use a pair of regular swim goggles, but you can buy Phil's fancy onion goggles here
    Proof that I am a nerd.
There you have it. Five things my kitchen would be incomplete without. I could write a book on my favorite cooking gadgets, however, so look for many more posts on this topic!

What are your cooking essentials? Let me know in the comments!


Chickpea Salad from Adventuresome Kitchen

Happy 4th of July! I hope you're all enjoying a nice relaxing day off with friends and family.

I'm headed to a potluck today, and found myself without a recipe last night. I texted some friends in a panic and told them I was thinking about a chickpea salad, and my lovely friend Jessica came to my rescue with this link. It was a miracle! I actually had almost everything on hand, and only needed to run to the store for a few things this morning. So this post is dedicated to Jessica, for saving my 4th of July :)


As usual, I made a few modifications (less oil, mostly!) to the recipe, which I'll explain in this post, but you can head over to Adventuresome Kitchen for the original recipe if you like.


Chickpea Salad (adapted from Adventuresome Kitchen)

Ingredients (Serves about 10)

  • 4 cans chickpeas (garbanzo beans) drained
  • 1 large sweet potato, peeled and diced into cubes
  • 1 large red onion, diced
  • 1 pint of cherry tomatoes, halved
  • 1 bag, or several bunches of spinach, torn into smaller pieces
  • 2 1/2 tbs extra virgin olive oil
  • 1/4-1/2 cup vegetable broth or water
  • 3 tbs red wine vinegar
  • 1 tbs dried rosemary
  • 1 tbs herbes de provence
  • salt and pepper to taste

Method

  1. Preheat the oven to 350° F. Dice the sweet potato and onion. Place in a large bowl with 1/2 tbs oil and stir.
    Place on a parchment paper-lined cookie sheet and sprinkle lightly with salt. Cook until softened - about 30 minutes.
  2. Drain chickpeas and place in a large bowl. Add tomatoes. When the sweet potato onion combo has finished cooking, add to the bowl.
    I had a few different brands of chickpeas lying around. Can you see the color difference?
  3. Place the torn spinach and 1/4 cup vegetable broth into a large pan and heat over medium heat. Saute until the greens are barely wilted- about 2 minutes, adding more liquid if necessary. Add to the bowl.
    Magically shrinking spinach
  4. Whisk together the remaining 2 tbs oil, red wine vinegar, and herbs, and pour over salad.
  5. Using a large spoon, gently toss all the ingredients together.
  6. Salt and pepper to taste, and enjoy!

We'll be heading to the potluck with this, some blue corn chips and salsa, and a red summer wine. Hope you have a beautiful day!

Nutrition (Per 1 1/4 cup serving)


  • Calories: 219
  • Total Fat: 6.7 g
    • Saturated: 0.5 g
    • Polyunsaturated: 0.4 g
    • Monounsaturated: 2.5 g
    • Trans: 0 g
  • Cholesterol: 0mg
  • Sodium: 430.5 mg
  • Potassium: 219 mg
  • Carbs: 37.9 g
    • Fiber: 12 g
    • Sugars: 4.6 g
  • Protein: 9.8 g
  • Vitamin A: 114.7%
  • Vitamin C: 18.8%
  • Calcium: 9.5%
  • Iron: 41%